

Table of Contents
Friends, if you are facing difficulty in filling out the SBI KYC form, then do not worry. In today’s post, we are going to tell you about the correct and accurate way How to Fill KYC Form of SBI. Therefore, read our block post carefully so that you do not face any problems regarding the SBI KYC form in the future.
In Short
We have presented below a summary of how to fill SBI KYC form.
1. Getting the KYC Form
The first task is to obtain a hard copy of the SBI KYC form, which is available online or at a bank branch.
2. SBI KYC Form Fill Up
Our next task is to fill out the KYC form. There are 4 sections to this form, and each one must be filled out carefully.
In the below paragraphs, these 4 sections have been explained in detail.
3. Submitting Identity Proof
A valid identity document must be attached to the KYC form once it has been completed. The identity documents may include an Aadhar Card, PAN Card, NAREGA, etc.
4. Affixing Passport-sized Photograph
Now affix one passport-size photo on the KYC form with your cross sign on it.
5. Signing it
Our next work is to sign this form which is the most essential part of this process.
6. Submitting the KYC Form to Bank Branch
After doing all the things perfectly, our last task is to submit the KYC form to your nearest bank branch so that your KYC can be processed at the earliest.
How to Fill KYC Form of SBI
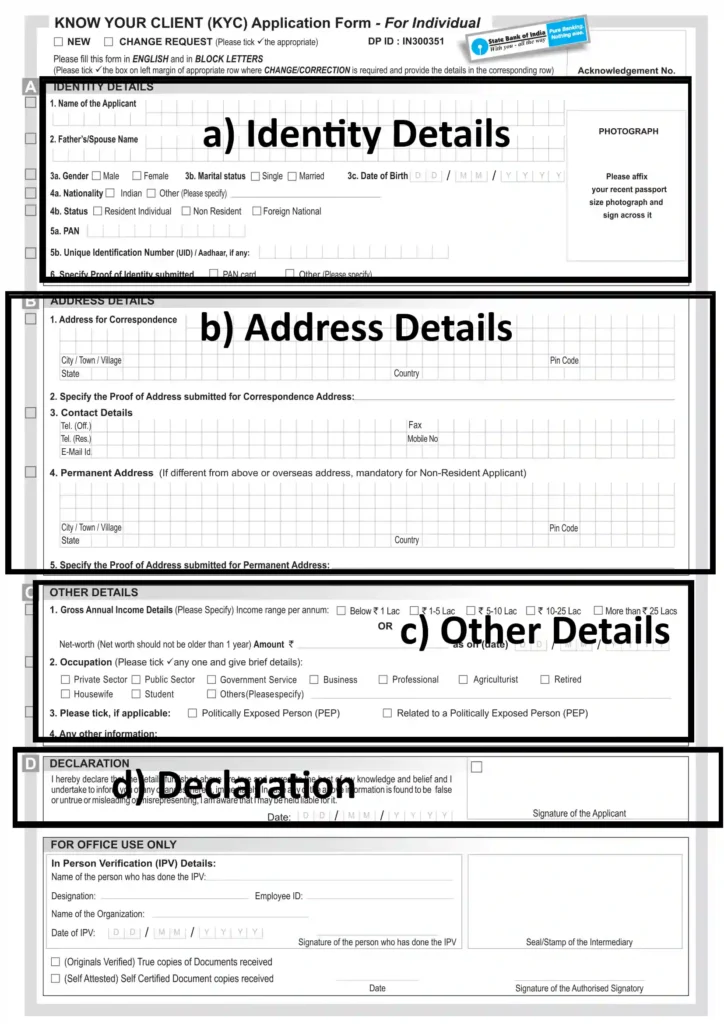
SBI KYC form is generally divided into four parts which are as follows.
A) Identity Details
B) Address Details
C) Other Details
D) Declaration
For your convenience, we have also given a picture below, in which you can see all these four parts. If your SBI KYC form is different from the below image, you can click here. By visiting this link, you will get a different version of the SBI KYC Form because the SBI KYC form comes in multiple variations.
So let us start filling out this application form.
A) Identity Details
1) Name of the Applicant: The name of the individual requesting KYC completion must be entered here. It is mandatory to have space between First and Last Name. Like:- Manoj Tiwari
2) Father’s/Spouse Name: In this, you have to write the name of your father or husband/wife.
3a) Gender: If you are a man then tick on Male or if you are a woman then tick on Female.
3b) Martial Status: If you are married then tick Married or click on Single!
3c) Date of Birth: In this field, you have to write your date of birth in DD/MM/YYYY format.
4a) Nationality: In this section, you have to verify your nationality. If you are an Indian citizen then you have to put a tick on Indian.
4b) Status: If you live in India then you have to click on Resident Individual.
5a) PAN: In this, you have to enter your PAN card number.
5b) Unique Identification Number (UID): Here you have to write your Aadhar Number.
6. Specify Proof of Identity Submitted: In this section, you can click on the PAN card option. If you select PAN card then you will have to attach a photocopy of your PAN card with your application. Or if you click on Other then you will have to attach a copy of your Aadhar card with this application.
B. Address Details
1. Address for Correspondence: In this, you have to give the complete address of your address like your village name, post office, tehsil, district, state, and pin code.
2. Specify the Proof of Address submitted for Correspondence Address: In this, you have to write AADHAR in the English language. This means that you are giving your Aadhar card for address verification!
3. Contact Details: In this, you have to write your mobile number and email ID.
4. Permanent Address: If you live somewhere on rent, then you have to give the complete address of your home address and if you live at your own home, then there is no need to fill this option.
5. Specify the Proof of Address Submitted for Permanent Address: If your permanent address is only one, then you do not have to fill anything in this option either!
C. Other Details
1. Gross Annual Income Details: In this option, you have to fill in your annual income. Choose the appropriate box according to you.
2. Occupation: Through this option, you are being asked what type of business you do. For example, if you are a farmer then you can tick the Agriculturist option and if you are enrolled in a school, college, or university, select the Student option.
3. Please Tick, if Applicable: If you belong to any political party then you need to fill in this option otherwise not!
4. Any Other Information: You do not need to write anything in this.
D. Declaration
Date: In the date section, you have to write the date on which you are filling out this KYC form.
Signature of the Applicant: You will see a box in the signature section, after ticking it, you have to put your signature just below it. In this way, you can fill your SBI KYC form easily.
Documents required for SBI KYC Form Fill Up
Once you have filled out the SBI KYC form, it is mandatory to attach the following documents with it!
- Aadhar card/Driving license/Voter card/NREGA card
- PAN card
- Bank passbook
- One passport-size photograph
SBI KYC Form Download
If you want to download the SBI KYC form, we have given a link below on which you can click and download it.
Conclusion
So, friends, you have seen how we can fill out our SBI KYC form easily! You do not need to do anything special to fill out this form, we just need to provide some important information like your name, father’s name, full address, your annual income, and signature.
FAQs for How to Fill Up KYC Form SBI
Q: What is KYC?
Ans: KYC, or Know Your Customer, is a process implemented by banks to verify the identity of their customers, ensuring the legitimacy of their accounts.
Q: Can I submit my KYC in any SBI branch?
Ans: Yes, you can go to any SBI branch to submit your KYC. However, it is best to visit the SBI branch where you have an account.
Q: How to fill up SBI KYC form?
Ans: In the KYC form, first of all, we have to fill out a KYC form. After filling out this form, we have to attach some important documents like Aadhar card, PAN card, photo, etc. with it. After signing and affixing a passport-size photograph, we have to deposit it in our bank branch.
Q: From where I can get the SBI KYC form?
Ans: You will get SBI KYC in your bank branch or you can also download it online. Calling to download is given in this block post above.

Hello friends, I am Jony Baku and a resident of Haryana, India. I took my first step into the blogging world in 2019 and since then I have been trying to contribute in this field. I love writing and reading articles, that's why I try hard to write my articles as best as possible.
2 thoughts on “KYC Made Easy: Your Ultimate Guide on How to Fill KYC Form of SBI”